Cutting Problem Gem Rough for the Best Color
Problem gem rough can challenge novice faceters. Learn how to judge colors so you can orient such a stone and cut for the best color in the finished gem.
3 Minute Read
I often hear the following question:
"How do I cut a stone with different colors on different axes?"
This is a difficult question to answer definitively. The rule of thumb is to cut for the best color when you can. Naturally, most of the time that runs along the narrow direction of the rough. (Of course). So, what do you do then?
Know Your Rough
First, try the easiest solution: Don't buy this type of rough!
Unfortunately, like everyone else, you'll still manage to acquire some of this material. By the way, you'll see a lot of this type of rough for sale. Guess why? Since this material is usually less desirable, gem dealers who are aware of this sell it to customers who aren't.
All's fair in love and faceting, so buyer beware.
Either don't buy this type of rough or buy it cheap, knowing you'll need to work around the problems.
In other words, you'll likely find the top rough material in dealers' gemstone cases, as cut pieces. Whatever rough they bought and judged to be lower quality for cut pieces, they'll sell as rough. This isn't always the case, but remember that dealers want to make the most money they can. The better stones bring more money and sell more easily when cut. It's just business.
Do the Rough Colors Complement Each Other?
To get the best color from the finished gem, make sure the colors of the two axes complement each other. Bear in mind, for faceting purposes, I don't necessarily mean colors that are opposite each other on the color wheel. These colors have to complement each other but may not be "complementary colors." Read my article on the color wheel in gemology for more information.
You should use a dichroscope to distinguish the true colors of pleochroic gems along each axis. See my article to learn how to visualize gem colors before cutting and how to orient a gemstone.
Sample Cut: A Green Tourmaline
Take a look at the finished tourmaline gem at the top of this article. It features my Samurai cut. Notice it's a very nice, kelly green with some blue/green and yellow/green. It's very bright, too.
Due to the shape of the rough, I had to cut this gem on the C axis. This direction had a less desirable olive color. If you'd only observed the color on the C axis, you'd probably be surprised how well the gem turned out. However, the A/B axis had a very nice blue/green color. I knew this rough would actually cut a nice green stone when the colors mixed.
Now, let's go back and look at the rough before cutting.
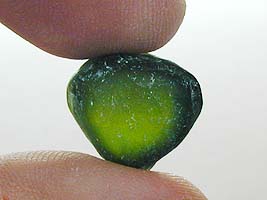
The Axis with the Less Desirable Color
To the right, you can see the color the tourmaline rough showed on its C axis. Note the darker yellow/green with some olive in it. Normally, I wouldn't consider buying and cutting rough with this color. Olive stones, especially yellow/olive/green ones, typically have lower end colors. Thus, they're just hard to sell. Furthermore, these colors usually don't come out too bright in a finished stone.
In this case, however, the other axis had a good color that complemented the poor axis color.
The Axis with the Best Color
The A/B axis, on the other hand, shows a very pretty blue/green color. Too bad this rough wasn't wide enough to cut on this axis. Of course, as you can see to the right, this was the best hue of the two the pleochroic gem showed. Normally, I would cut for this color, even if I have to sacrifice some finished weight. A blue/green gem fetches a higher price than an olive gem.
The Finished Gem
With this piece of rough, I had no choice. The yield was on the yellow/olive C axis. Also, notice that the A/B axis has a pretty large flaw. (When I cut into it, I discovered it was actually three flaws).
Personally, I end up cutting a lot of this type of flawed material myself. I can't sell it rough.
As you can see from the photo of the finished gem, the colors mixed nicely. In this case, I created a high-end gemstone.
Generally, the color you cut for, looking through the table, will be the dominant color of the finished gemstone. However, when dealing with "complementary colors," the color on the girdle axis, whichever that may be, will often influence substantially the finished stone's color. For a standard brilliant design, I'd say the finished stone color will end up 70/30 to 60/40. 70 and 60 represent the color seen through the table. 30 and 40 represent the color seen through the girdle.
Other Factors for Best Color
Keep in mind that other factors will influence the finished gem color, sometimes substantially. Chief among them, gem designs. Choosing designs for rough, especially problem rough, is almost an art form. I'll cover that subject in another article.
Jeff R. Graham
The late Jeff Graham was a prolific faceter, creator of many original faceting designs, and the author of several highly-regarded instructional faceting books such as Gram Faceting Designs.
Related Articles
The Questionable Andesine Story
“Not for Profit” Faceting Clubs
Designs and Designing: GemCad
Buying Gemstones from Shopping Networks
Latest Articles
800 Years of Mogok: A Celebration in Tenuous Times
What is the Average Gemstone Faceting Yield?
Pyroxmangite Value, Price, and Jewelry Information
How to Identify Emerald Simulants and Synthetics
Never Stop Learning
When you join the IGS community, you get trusted diamond & gemstone information when you need it.
Get Gemology Insights
Get started with the International Gem Society’s free guide to gemstone identification. Join our weekly newsletter & get a free copy of the Gem ID Checklist!
